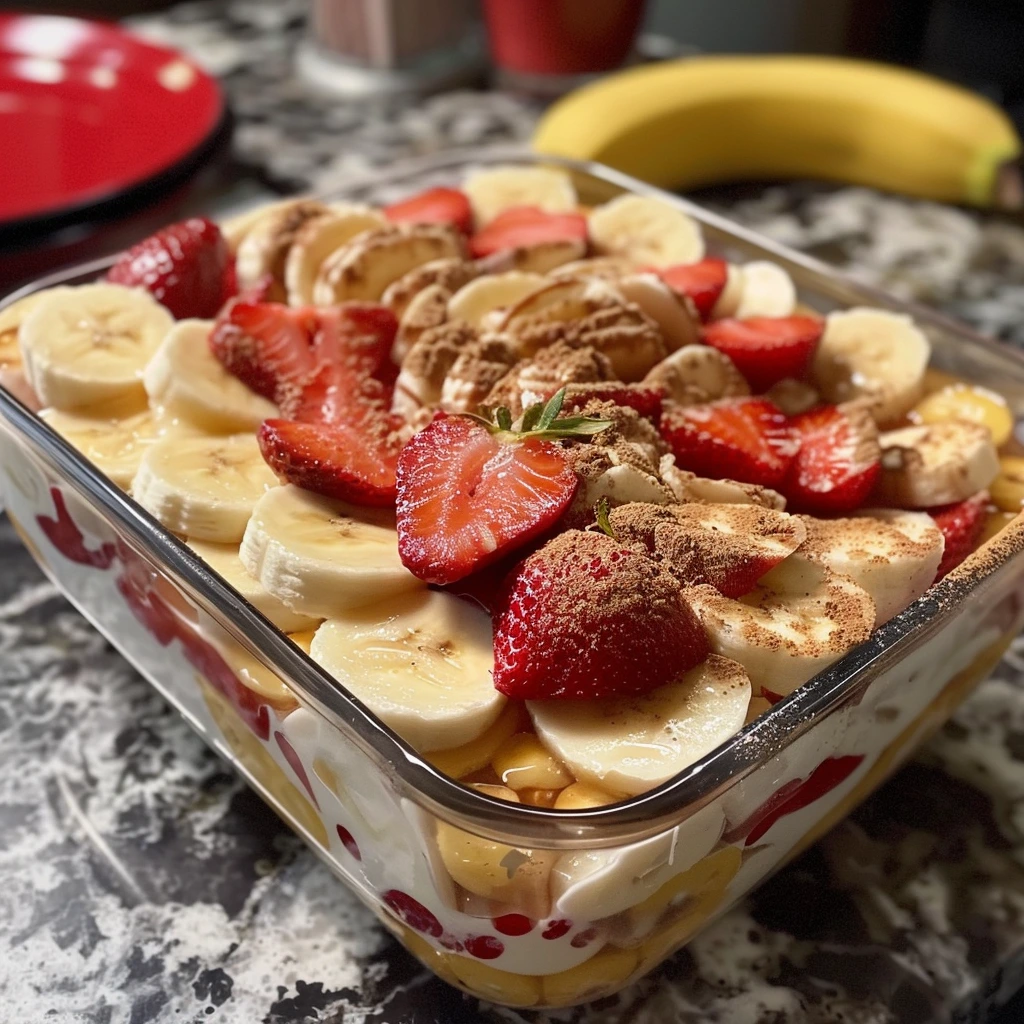
If you’ve ever craved a dessert that tastes like summer sunshine — sweet strawberries, tender bananas, creamy pudding all in one dish — then this Strawberry Banana Pudding Dream is your new go‑to. It’s no‑bake (so no oven heat!), layered with fluffy pudding, juicy fruit, and soft cookies, and always disappears fast at family dinners, parties, or lazy Sunday afternoons. Let’s dive into why this dessert is a winner, and how you can make it shine with very little fuss.

Why Strawberry Banana Pudding Dream Works So Well
A Fresh, No-Bake Dessert Perfect for Summer
This dessert is a cool, light option for hot days. Since it sets in the fridge, you don’t have to worry about heating up the kitchen, making it ideal for summer gatherings or quick, refreshing treats. The combination of creamy pudding, fresh fruit, and soft cookies creates a delightful mix of flavors and textures in every bite.
A Balance of Creaminess, Fruit, and Texture
The creamy pudding base folded with whipped topping gives a light, airy texture, while bananas provide mellow sweetness and strawberries add bright, juicy flavor. Vanilla wafers or soft cookies give just the right amount of crunch, making each spoonful a perfect balance of soft and slightly firm textures.
Simple Ingredients That Are Easy to Find
Most of the ingredients are common in American kitchens: instant vanilla pudding, milk, whipped topping or cream, bananas, strawberries, and vanilla wafers or graham crackers. No fancy or specialty items required. These familiar ingredients make the recipe beginner-friendly, accessible, and forgiving.
Flexible and Customizable
This dessert is easily adaptable. Use lighter whipped topping or yogurt for a lighter version, or add extra cream for richness. You can swap in seasonal fruits if strawberries or bananas aren’t available, or try different cookies to create unique textures. It’s a versatile dessert that works with whatever you have on hand.
How to Make Strawberry Banana Pudding Dream
Ingredients You’ll Need
- 1 box (3.4 oz) instant vanilla pudding mix
- 2 cups cold milk
- 1 (8 oz) container whipped topping or 2 cups whipped heavy cream
- 3–4 ripe bananas, sliced thin
- 1–2 cups fresh strawberries, hulled and sliced
- 12 oz vanilla wafers or graham crackers
- Optional: splash of vanilla extract, lemon juice for banana slices, extra fruit or cookie crumbs for garnish
Step 1: Gather and Prepare Ingredients
Before starting, make sure all ingredients are ready and measured. This makes assembly smooth and stress-free. You’ll need:
- Instant vanilla pudding mix and cold milk for the creamy base
- Whipped topping or whipped cream for lightness
- Fresh bananas and strawberries for natural sweetness and texture
- Vanilla wafers or soft cookies for layering and crunch
- Optional: vanilla extract for extra flavor, and a squeeze of lemon juice to keep bananas from browning
Take a moment to slice the bananas and strawberries evenly. Even slices ensure balanced layers and make every bite consistent. Toss the banana slices lightly with lemon juice if you want them to stay bright and fresh.
Step 2: Prepare the Creamy Pudding Mixture
- In a large mixing bowl, whisk the instant pudding mix with cold milk for 2–3 minutes until thick and smooth.
- Gently fold in the whipped topping or whipped cream, being careful not to overmix. This step creates a light, fluffy pudding base that holds up beautifully in layers.
- Optional: Add 1 teaspoon of vanilla extract or a pinch of cinnamon to enhance flavor.
Step 3: Layer the Dessert
- Start with a base layer of cookies or wafers at the bottom of your 9×13-inch dish or trifle bowl. This gives structure and a slightly crunchy texture.
- Add a layer of banana slices on top of the cookies, followed by a layer of strawberries.
- Spoon a generous layer of the pudding mixture over the fruit, smoothing it gently with a spatula.
- Repeat the layers: cookies, bananas, strawberries, and pudding until all ingredients are used. Finish with a final layer of pudding to create a clean, creamy top.
Pro Tip: Make sure each layer has a combination of pudding, fruit, and cookies so every spoonful has a balance of flavors and textures.
Step 4: Garnish for Presentation
- Decorate the top layer with extra slices of banana and strawberries for a visually appealing finish.
- For added flair, sprinkle crushed cookies or wafer crumbs, or lightly drizzle fruit syrup. This gives your pudding a professional, inviting look.
Step 5: Chill and Let Flavors Meld
- Cover the dessert tightly with plastic wrap or a lid and refrigerate for at least 2 hours, or preferably overnight.
- Chilling allows the pudding to firm up, the cookies to soften slightly, and the fruit flavors to blend perfectly.
Step 6: Serve and Enjoy
- Serve chilled, using a wide spoon to scoop through the layers so each serving includes pudding, fruit, and cookie.
- This dessert works beautifully in a trifle dish to showcase the layers, or in individual cups for a cute, portion-controlled option.
Additional Tips for Success
- Use firm but ripe bananas to prevent mushy layers.
- Fresh, sweet strawberries will enhance the natural fruit flavor without adding extra sugar.
- Be gentle when folding whipped topping into the pudding to maintain lightness.
- For variation, you can add blueberries, raspberries, or other seasonal fruit for extra color and flavor.
- Make individual servings for parties to save time and create a visually appealing presentation.
By following these steps carefully, you’ll end up with a Strawberry Banana Pudding Dream that is creamy, layered, flavorful, and picture-perfect every time. It’s an easy, no-bake dessert that’s sure to impress both family and friends.
Tips for Best Results and Variations
Creating the perfect Strawberry Banana Pudding Dream is easier than you think, but a few simple tips can make it truly outstanding. Follow these suggestions to enhance flavor, texture, and presentation, and discover creative variations that let you personalize this no-bake dessert for any occasion.
Choose the Right Fruit
- Bananas: Use ripe but firm bananas. Overripe bananas can become mushy and overly sweet, while under-ripe bananas may taste bland. To prevent browning, toss slices with a small squeeze of lemon juice just before layering.
- Strawberries: Select fresh, sweet, and firm strawberries. Soft or watery berries can make the dessert soggy. If strawberries are very large, slice them into halves or quarters for even layering.
Layer Strategically
- Aim for balance in every bite. Make sure each layer includes a mix of pudding, fruit, and wafers. This ensures consistent flavor and texture from top to bottom.
- Place the more delicate fruits toward the middle or top layers to prevent them from getting crushed under the weight of cookies.
Pudding and Whipped Topping Tips
- Fold whipped topping or whipped cream gently into the pudding to maintain a light, airy texture. Overmixing can make it too dense.
- For extra flavor, add a teaspoon of vanilla extract to the pudding mixture. Some cooks also like a small pinch of cinnamon for a warm undertone.
Cookie/Wafer Layer Advice
- Vanilla wafers are classic, but graham crackers or other soft cookies work well too. Avoid cookies that are too hard; they may not soften properly and can make layering difficult.
- If you like a slightly crunchier texture, layer cookies immediately before serving instead of chilling them for too long.
Make-Ahead and Storage Tips
- This dessert actually improves in flavor when made a few hours or overnight ahead of time. The pudding firms up, wafers soften just right, and the fruit releases natural juices that blend flavors.
- Cover the dessert tightly with plastic wrap or a lid to prevent it from absorbing fridge odors. Consume within 2–3 days for the best taste and texture.
Creative Variations
- Berry Twist: Swap half of the strawberries with blueberries or raspberries for a colorful, tangy variation.
- Tropical Flair: Add slices of kiwi, mango, or pineapple to give your pudding a tropical vibe.
- Chocolate Lover’s Version: Sprinkle chocolate shavings or mini chocolate chips between the layers for a richer, decadent treat.
- Lighter Option: Use light whipped cream, yogurt, or a combination of both instead of full whipped topping for a healthier, lower-calorie dessert.
- Mini Portions: Assemble the pudding in individual cups or jars for a cute presentation that’s easy to serve at parties or picnics.
Presentation Tips
- Garnish the top layer with fresh fruit slices, cookie crumbs, or a small drizzle of fruit syrup to make it visually appealing.
- Serve chilled in a glass trifle dish to showcase the beautiful layers — it’s almost too pretty to eat, but we know it won’t last long!
Following these tips ensures your Strawberry Banana Pudding Dream comes out creamy, flavorful, and visually stunning every time. Plus, the variations allow you to customize it for different occasions, dietary preferences, or simply to experiment with new flavors.
Frequently Asked Questions
Can I make this in individual cups instead of a big dish?
Absolutely! Layer pudding, fruit, and cookies in jars or cups for individual servings. It makes serving easier and adds a charming touch for parties.
How far in advance can I prepare it?
You can assemble the dessert 2–4 hours before serving, or even the night before. Chilling overnight often improves flavor and texture.
Can I freeze leftovers?
Freezing isn’t recommended. The creamy pudding and fruit can separate, and the texture may become watery after thawing. Store leftovers in the fridge for 2–3 days for the best quality.
Can I use other fruits instead of strawberries or bananas?
Yes! Berries, peaches, or even mangoes work well. Softer fruits may release more juice, slightly affecting texture, but the dessert will still taste delicious.
Conclusion
Strawberry Banana Pudding Dream is the ultimate no-bake dessert for summer, offering layers of creamy vanilla pudding, whipped topping, ripe bananas, juicy strawberries, and soft cookies. It’s easy to make, perfect for entertaining, and comforting enough for a cozy night in. With simple ingredients and minimal effort, you can create a visually stunning, flavorful dessert that everyone will love. Layer it, chill it, and watch it disappear in record time.
Print
Strawberry Banana Pudding Dream
- Total Time: ~2–4 hours
Description
A delightful, no-bake layered dessert — creamy vanilla pudding meets ripe bananas, juicy strawberries, and soft vanilla wafers for a sweet, refreshing treat perfect for summer, parties, or cozy nights in.
Ingredients
1 box (3.4 oz) instant vanilla pudding mix
2 cups cold milk
1 (8 oz) container whipped topping or 2 cups whipped heavy cream
3–4 ripe bananas, sliced thin
1–2 cups fresh strawberries, hulled and sliced
12 oz vanilla wafers or graham crackers
Optional: splash of vanilla extract, lemon juice for banana slices, extra fruit or cookie crumbs for garnish
Instructions
Whisk the pudding mix with cold milk until thickened.
Fold in whipped topping or cream until smooth and airy.
Slice bananas and strawberries; toss bananas with lemon juice if desired.
In a 9×13-inch dish, layer cookies, bananas, strawberries, and pudding mixture. Repeat until all ingredients are used.
Finish with pudding and garnish with extra fruit or crumbs.
Cover and refrigerate for at least 2 hours or overnight.
Notes
Use ripe but firm fruit for best texture.
Swap whipped cream for yogurt or lighter cream for a healthier version.
Consume within 2–3 days if stored in the fridge.
- Prep Time: 15 minutes
- Cook Time: Chill Time: 2–4 hours (or overnight)
Nutrition
- Serving Size: 8–10
